How to Use ChatGPT Dots: A Step-by-Step Tutorial with Official Images
Set up your ChatGPT Dot, give it a useful first task, confirm follow-ups and learn how to stop work. Includes official OpenAI illustrations and original example prompts.
A useful first job for ChatGPT Dots is small enough to check and important enough to revisit. Instead of asking it to “manage my entire business,” try asking it to keep a weekly content plan accurate as deadlines and sources change.
This tutorial walks through that example, from creating your Dot to reviewing its work and stopping follow-ups. The prompts are original examples you can adapt. The images are captures of OpenAI’s official interface illustrations, not generated screenshots or evidence of a task we ran.
What is a ChatGPT Dot?
A Dot is an ongoing AI agent that can coordinate work between conversations, bring back results and ask for decisions. OpenAI says it runs in the cloud with its own computer and browser, powered by GPT-6 Astra. It can help with research, documents, data and software. You still need to review its output. See the official Dots overview.
Before you start: check access
As checked on October 8, 2026, OpenAI lists a gradual rollout to:
- Pro 100, Pro 200 and Pro 500: users over 18 outside the European Economic Area, UK and Switzerland.
- Business Premium: worldwide rollout.
- Enterprise: worldwide rollout, with administrator enablement required; Dots is off by default.
An eligible plan does not guarantee immediate access. Check current availability before upgrading specifically for this feature. Dot conversations do not count toward ChatGPT usage limits, but Work and Codex tasks it manages use those products’ limits; deeper work also has a plan allowance. This is not an unlimited-work promise.
Step 1: Create your Dot on desktop
Open Dots in the ChatGPT desktop app or a desktop browser and follow the introduction. You can connect apps during setup or leave them for later. The desktop app also offers a choice about connecting your computer. Give your Dot a recognizable name, such as “Content Assistant”; its appearance can be personalized too. These steps follow OpenAI’s getting-started guide.
For the first exercise, start with a short plan you can paste into the conversation. That lets you judge the result before deciding whether it needs access to an inbox, shared drive or local files.
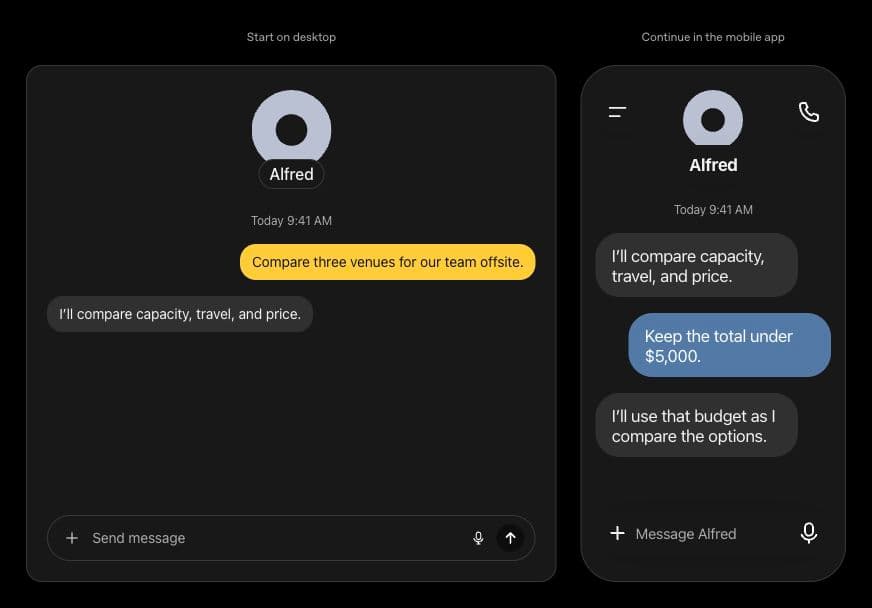
After desktop setup, you can use the same Dot in the mobile app when its supporting update is available. Mobile web is not supported. The messaging guide also describes voice calls and supported Slack and Teams connections. Ending a call does not necessarily stop assigned work.
What the cover shows: OpenAI’s illustration follows one conversation from desktop to mobile. The user adds a budget constraint on the phone. The teaching point is continuity: a later message can refine work already underway.
Step 2: Give it a responsibility with a clear finish line
Use this fictional planning exercise, replacing the details with your own:
Help me maintain a three-article content plan for this week. The topics are a beginner AI glossary, a local-AI setup guide and a privacy checklist. Treat these as proposed articles, not completed work. For each, track the reader’s question, missing sources, next action and deadline. Ask me for any missing deadlines. Draft suggestions only; do not publish, send messages or change connected documents. Start by showing me the plan and the three biggest gaps.
This prompt defines the deliverable and makes missing information visible. You should get something you can inspect: three entries, their unanswered questions and a next action for each. If the Dot invents dates, sources or a completed status, correct that before expanding the job.
A useful correction might be:
The privacy checklist is due Friday at 5 PM Asia/Kolkata. The other two do not have deadlines yet. Mark them as undecided. For the local-AI guide, the next action is checking hardware requirements against the official documentation.
Your first success criterion is accuracy, not volume. A concise plan with honest gaps is more useful than a polished page full of assumptions.
Step 3: Connect only the material the task needs
Apps, messaging channels and your personal computer are separate connections. Adding a contact method does not also connect your email or files. Supported plugins use their own connected accounts and permissions. Review both before granting access. See the connection overview.
If the plan lives in a document service, connect the relevant supported plugin. If it needs files on your computer, the desktop path is your Dot’s profile, Computers → Your computer → Allow access; review the confirmation before proceeding. Only one personal computer can be connected at a time. Local work requires that computer to be online with ChatGPT open; cloud work can continue without it. These requirements are detailed in computers and apps.
For our exercise, tell the Dot exactly which planning document it should use and whether you want suggestions in chat or edits to that document. “Help with my content” leaves too much room for interpretation.
Step 4: Handle website sign-in privately
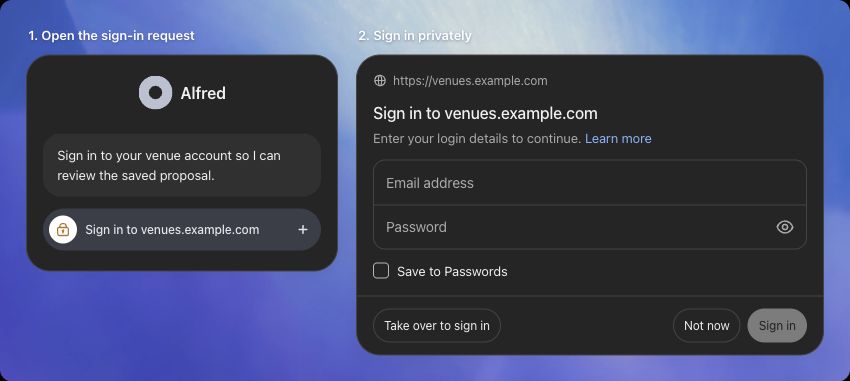
A Dot’s cloud browser has separate sessions from your browser. When login is needed, use the private sign-in request or take over the browser to complete it yourself. Credentials belong in that flow, not in the conversation. OpenAI documents optional password saving and confirmation when a saved login is reused. See the website sign-in instructions.
Step 5: Turn the plan into a confirmed follow-up
Once the initial plan is right, ask for a limited recurring check. The tasks and memory guide says to specify timing, time zone, notification conditions and destination, then confirm what was saved. For example:
For the next seven days, review the content plan each weekday at 9 AM Asia/Kolkata. Use only the sources I have shared or explicitly connected for this task. Send the summary here in ChatGPT. Flag deadlines within 48 hours and unanswered questions; do not publish or contact anyone. Tell me the exact schedule, end date and information sources you saved. If you cannot save it, say so.
Check the confirmation against your request. “I’ll keep an eye on it” is not enough to verify a fixed schedule. Open Scheduled and inspect the saved entry.
The same guide explains that a Dot carries relevant context and its own notes forward. Those notes are not a complete transcript. When a decision changes, state the replacement clearly: which article, which date, and which earlier instruction it supersedes.
Step 6: Review the work before using it
In the desktop app, open the Dot’s profile and select Activity. Open delegated tasks to check progress, outputs and requests for input. If an approval or connection is missing, address that request. The controls guide explains these review tools.
For this content-plan exercise, check three things:
- Does every claimed fact have a source you can open?
- Are proposed ideas clearly separated from finished drafts?
- Do the dates and next actions match what you actually agreed?
Try a deliberate change: move the privacy checklist deadline and ask the Dot to identify which tasks are now urgent. That is a simple way to assess whether it is maintaining the plan rather than repeating an old summary.
For an ongoing approval boundary, OpenAI documents Settings → Personalization → Permissions → Custom rules. You could require approval before publishing. Rules do not grant app access or override built-in safeguards, and they can be followed imperfectly; review remains necessary.
Step 7: Stop the right kind of work
OpenAI distinguishes three controls:
- Pause: stops the Dot’s current main task.
- Activity: open and stop a delegated task separately.
- Scheduled: disable or delete recurring work to prevent future runs.
Pausing does not cancel everything, and stopping cannot undo completed actions. After the seven-day experiment, inspect both active tasks and schedules. See the official stopping instructions.
If something does not work
Dots is missing: revisit eligibility and rollout status; Enterprise users may need their administrator to enable it.
A local task cannot continue: check whether the connected computer is online with the app open. An offline device is different from revoked access.
The result looks finished but is wrong: return to the specific source, deadline or missing requirement. Ask for a correction and verify it. A completed run is not proof that the intended result was achieved.
Start with one responsibility you can evaluate. Once the plan stays accurate through real changes, you can decide whether a second task or another connection would help. Our AI chatbot privacy guide offers broader checks for sharing information with assistants.
Source and image note: This tutorial is based on official OpenAI documentation checked October 8, 2026. The Bot Post wrote the example prompts and review exercise; we did not run this workflow in a personal Dot account. Interface illustrations are credited to OpenAI and captured from ChatGPT Learn. This is an independent tutorial, not an OpenAI publication.
About the author
UbedullaFounder & Editor
Founder and editor of The Bot Post, covering AI news and technology.